Step 2
Design Your Badge Template
Want to work with a Cawley artist?Create Your Base
Select how you want graphics, logos, and text to be applied or added to the badge—either full color or laser engraved.
Please Note: Full Color application yields highest detail for your products.
Add More Customization
Image must be black and white for engraving, if not, we will alter appropriately to engrave image.
If engraving badges, select only a 1-color image. If printing, select from both 1-color and multi-color images. Clip art appears in the order you add them, with the most recent in the foreground.
Transparent domes protect badges’ text and graphics and provide a finished look. Scratch and dent resistant.
Text fields are intended for words or phrases such as tag lines, mottos, and other universal text that will appear on all your badges. Text fields appear in front of clip art and other images.
The Select Style tab is where you indicate which base material (metal, wood, etc.) you want your badges to be made from. Some styles—including metal and plastic—require an additional "Style Type" selection to help us get your badge design exactly right.
Our most popular badges are:
- Metal Name Bars
- Metal Ovals
- Metal Frames
- Plastic 2-Ply Rectangles
- Chalkboard Rectangles
Need help choosing your badge shape or size? Check out our collection of badge templates in the Support Center.
Full-color is the most common application option, but we also offer engraved badges. You may only select one application—you cannot combine the two application methods on one product. If you choose full-color printing, both the logo and name will be printed in color. If you select the engraved option, both the logo and text will be engraved. Some products may not have both the full-color application or the engraved option available.
All engraved logos need to be black and white with no shading; you'll upload logos and other image files in the Add Images tab.
If you want to personalize your own badges using labels, markers, or a digital printer, please start over and select the "Do It Yourself" method in Step 1.


Group of Engraved Badges & Close Up of Engraved Wood Badge


Group of Full-Color Badges & Close Up of Badge with Full-Color Printed Logo
If your logo or image has a white box behind it, we will make sure the box is removed before printing your badges. Please proceed with your design.
Ensure your logo or image file is a .PNG or .JPG (at least 300dpi) format and that the file is compressed to 1MB or less before uploading.
All engraved logos must be black and white, with no shading. Multi-color or multi-dimensional logo files cannot be engraved. If you need assistance converting your logo to a 1-color version, please contact us. If you upload a logo file we cannot use, we will contact you via phone or email to discuss our design services (read more on design services).
Please note: If you are using uploaded images along with clip art or fixed text, the text will always appear in front of other graphics. When layered atop each other, clip art will always appear in front of uplaoded graphics. Graphics appear in the order you added them to the badge, with the most recently added in the foreground. To edit order of graphics, delete and re-add them in the order you desire.
High-Quality Image Examples
Crisp, high-resolution images that will look great on badges


Poor-Quality Image Examples
Blurry, low-resolution images that do not transfer well to badge surfaces
![]()
![]()


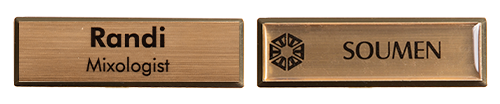
Example of 1-Color Art (left) & Example of Multi-Color Art (right)
Please note: If you are adding multiple instances of clip art, the most recently added will appear in the foreground. Text and text fields will always appear in front of clip art, which will always appear in front of uploaded images. To edit order of graphics, delete and re-add them in the order you desire.
.png "doming-example-(1).png")
Metal badge without clear dome (left) versus Metal badge with dome (right)

On this badge, the company's tagline "Clean. Courteous. Classy." is a fixed text field, meaning it will appear on all badges regardless of personalization (employee names). The name "Jill" is an example of a personalization text field, which varies from badge to badge (added/managed in next tab).
Please note: If you are adding fixed text fields along with one or more graphics, they will always appear in front of clip art, which will always appear in front of uploaded images. Multiple clip art selections will appear in the order you added them to the badge, with the most recently added in the foreground. To edit order of graphics, delete and re-add them in the order you desire.
To continue, add and position at least one text field to your design. Do this by selecting the “Add Text Field” option and position it within the badge template where you want your names and other text printed. This step adds the text field to your design. You will enter the text/names on the next screen.
If you don’t want a personalization text field, return to Personalization & Design Options.
Please choose a location and ratio for your photo from the personalized photo. You will upload photos on the next screen.
If you didn't intend on creating a photo ID badge and need to see other options, check out all our badge styles.